How to Apply Eyeshadow Like a Pro: Step-by-Step Application Guide

You can learn to apply eyeshadow like a pro by using simple steps, the right brushes, and a little practice. Start by matching techniques to your eye shape and color, use a primer and clean brushes, and build color slowly so you control the look. With the right prep and a few blending tricks, you can create polished everyday looks and bold glam styles that last.
This guide walks you through the tools to use, how to place color for your eye shape, and quick fixes for common mistakes. Follow small, clear steps and you’ll see faster, neater results that make your eyes stand out.
Key Takeaways
- Match techniques to your eye shape and color for better results.
- Use a primer, the right brushes, and build color slowly.
- Learn simple fixes and finishes for polished, lasting looks.
Understanding Eye Shape and Color
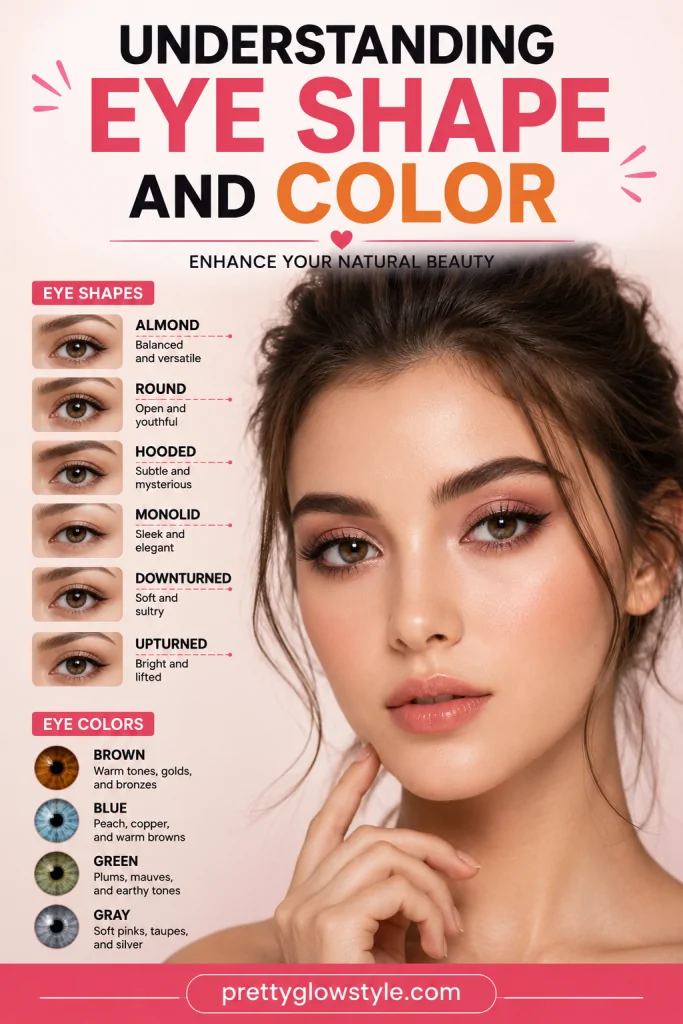
Knowing your eye shape and color helps you pick shades that make your eyes stand out and choose application spots that flatter your features. This section explains how to identify common shapes, which colors lift specific eye hues, and how shape changes where you place shadow and liner.
Identifying Your Eye Shape
Look straight into a mirror with your face relaxed. Notice where your brow bone sits, how visible your crease is, and whether the outer corners lift or drop.
Common shapes include:
- Almond: Visible crease, slightly tapered outer corners. Most shadow placements work well.
- Hooded: Crease is hidden under a fold. Place darker shades slightly above the natural crease.
- Round: White of the eye shows above and below the iris. Darken outer corners to elongate.
- Monolid: Little to no crease. Build depth with layered cream and powder shadows.
- Downturned/Upturned: Outer corners dip or lift. Blend shadow upward for downturned, and balance by softening the lift for upturned.
Use a small brush to map a few test strokes. That shows where color collects and which areas need lifting or softening.
Choosing Shades for Your Eye Color
Pick contrast colors to make your eye color pop. Warmer tones usually enhance cool eyes, and cool tones can deepen warm eyes.
Quick guide:
- Blue eyes: Copper, bronze, warm peach, and terracotta intensify blue.
- Green eyes: Plum, burgundy, mauve, and deep green make greens richer.
- Brown eyes: Navy, emerald, bronze, and gold offer strong contrast.
- Hazel eyes: Olive, warm browns, and berry shades bring out flecks of color.
Use matte shades in the crease and shimmer on the lid or inner corner for brightness. Test one color family first, then add a darker shade at the outer corner for depth. Keep a neutral transition shade close to your skin tone to blend edges.
How Eye Shape Impacts Application
Your shape decides where to place light, medium, and dark shades for balance and lift. Follow rules that match your features rather than copying styles that suit other shapes.
Practical tips:
- Almond: Apply medium shade in the crease and dark at outer V; lid gets a shimmer or light matte.
- Hooded: Run transition shade above the crease to create a fake lid. Keep shimmer on the visible lid only.
- Round: Sweep darker color from the outer corner toward the temple to elongate the eye.
- Monolid: Use horizontal gradient—light in the center, medium on both sides, dark along lash line.
- Downturned: Lift outer shadow upward and finish with a thin flick of liner that angles up.
Always blend edges with a fluffy brush. That softens harsh lines and makes your chosen techniques look natural.
Essential Tools and Products for Eye Makeup

You need the right brushes, product types, and a good primer to get clean, long-lasting eyeshadow looks. Quality tools help you blend, place color, and add detail without fighting the formula.
Must-Have Eyeshadow Brushes
Use a small set of makeup brushes to cover every step. A blending brush (fluffy, medium-sized) softens edges and diffuses color in the crease. Use light windshield-wiper motions for smooth transitions.
A flat shader brush (dense, flat) packs powder or cream eyeshadow onto the lid. Press the brush to deposit pigment, then softly blend the edges.
A pencil brush works for the lower lash line, smudging, and precise outer-V work. Tap and small circular motions give control without harsh lines.
An angled liner brush (thin, firm) creates sharp shadow liners and helps apply gel or cream close to the lash line. It also shapes eyebrow product in a pinch.
Keep brushes clean and soft. A cheap brush can pull product and create patchy application. Aim for a set that includes these four to handle most looks.
Types of Eyeshadow and Their Uses
Match product type to the look you want. Powder eyeshadow is versatile for blending, building color, and creating matte or shimmer finishes. It works best with a good blending brush and an eyeshadow palette that mixes mattes and shimmers.
Cream eyeshadow gives more pigment and a dewy finish. Use a flat shader brush or fingertip to press it on the lid. Set cream with a matching powder shade for longer wear.
Shimmers and metallics show best when applied with a damp flat shader brush or over a tacky primer. Use powders for smokier, layered looks and creams for quick, bold color.
An “ultimate shadow palette” with neutral mattes, a few shimmer pops, and a dark liner shade covers most needs. Choose formulas that layer well and don’t cake or flake.
Importance of Eyeshadow Primer
An eyeshadow primer (eye primer) creates a smooth base and increases wear time. It evens lid color, reduces creasing, and helps powders and creams stick.
If you have oily lids, primer prevents fallout and keeps colors vibrant all day. For dry lids, a thin layer still helps powder shades apply evenly.
Apply a pea-sized amount and blend with a fingertip or flat brush. Let it set for a few seconds before adding powder or cream eyeshadow.
Primed lids require less product and give truer color payoff from your palette. Use one whenever you want sharper blending, longer wear, or brighter shimmer finishes.
Prepping and Priming Your Eyes

Prepare your lids so color stays true, blends easily, and resists creasing. Focus on cleaning excess oil, applying a thin primer layer, and creating a smooth, even base for shadow.
How to Prime Your Eyelids
Choose an eyeshadow primer made for oily lids or long wear. Squeeze a pea-sized amount onto your fingertip or a small brush.
Tap a thin layer across each lid from lash line up to the crease. Blend outward with light, even pats so the texture looks smooth but not cakey.
If you don’t have a primer, use a dab of lightweight concealer or a powder-based eye primer. Let the product set for 15–30 seconds before you start applying shadow.
This step reduces creasing, increases pigment payoff, and keeps shimmer and mattes true to color.
Setting the Base for Eyeshadow
After priming, set the lid with a powder or matte shade close to your skin tone. Use a fluffy brush and apply with gentle windshield-wiper motions.
This creates an even surface that helps darker colors blend without patchiness.
For oily lids, press a thin layer of translucent powder into the primer to lock it down. If you want brighter color, pick a light matte shade that matches the palette’s undertone—warm or cool.
Setting also prevents tacky primer from grabbing too much product and causing fallout.
Concealer and Foundation Tips
If you use concealer as a primer substitute, pick one that’s lightweight and blends smoothly. Dot a tiny amount across the lid and blend with a damp sponge or brush.
Avoid heavy, full-coverage formulas that crease or shift when you apply shadow.
When you apply foundation first, check for transfer onto the lid and gently remove excess oil with a blotting sheet. If you prefer doing eyes first, clean up fallout and then apply foundation for a cleaner finish.
Match concealer shade closely to your skin to avoid changing shadow tones. Set any cream base lightly with powder before layering colors.
Step-by-Step Eyeshadow Application Techniques
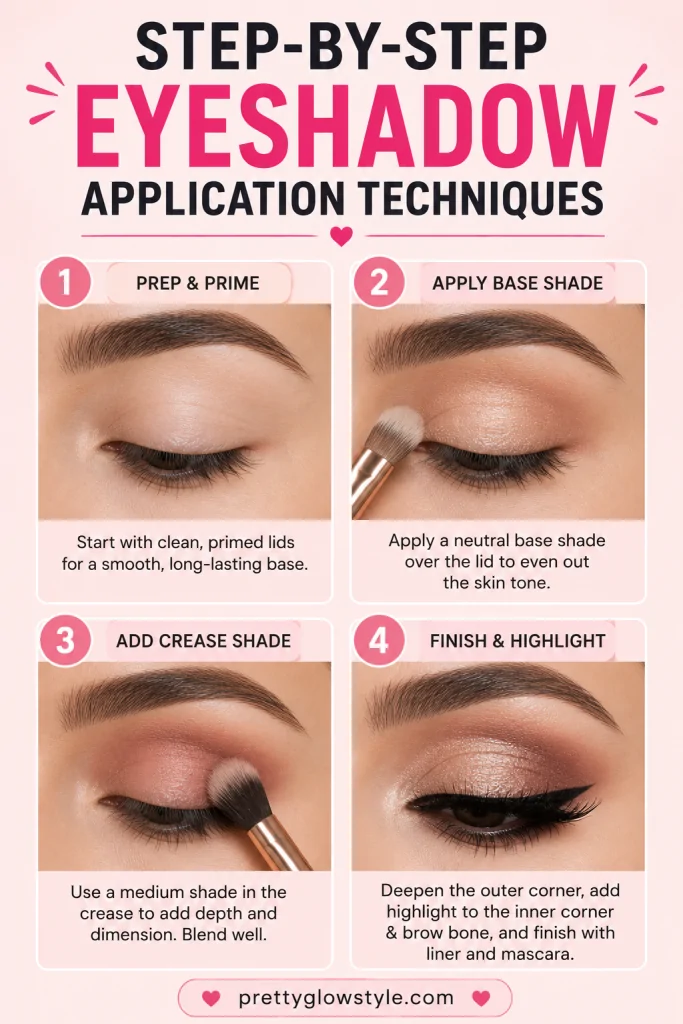
You will learn how to place colors, blend edges, and build depth so your eyes look shaped, even, and long-lasting. Follow clear steps for transition shades, lid color, blending, and adding darker tones.
Transition Shades and Crease Work
Start with a fluffy blending brush and a matte transition shade that is 1–3 tones darker than your skin. Sweep the color into the crease using windshield-wiper motions. Place the pigment slightly above your natural crease if your lids are hooded to make the crease visible when your eyes are open.
Work from light pressure to more build-up. Use small circular motions at the outer crease to soften any harsh lines. Repeat on the other eye, matching placement and intensity so both sides look even.
If you need more definition, add a slightly deeper matte shade just in the outer crease and blend the edge. Keep a clean brush nearby to soften edges without adding more product.
Applying Lid and Highlight Colors
Pick a flat shader brush or your fingertip for shimmery lid shades and a dense brush for matte lid colors. Pat shimmer or metallic shadows onto the center and inner lid for payoff. This pressing action reduces fallout and boosts color.
For matte lids, apply with a flat brush and then buff the edge with a blending brush. Use a light, shimmery shade on the inner corner and brow bone to brighten. Blend where the lid color meets the transition shade so there’s a smooth gradient.
If you use a cream eyeshadow base, apply it thinly first to intensify powder shadows. Press powder on top rather than sweeping to lock pigment and prevent patchiness.
Blending for a Seamless Finish
Blend with a clean, fluffy brush using soft back-and-forth motions. Focus on the outer edge and where two colors meet. Blending should remove hard lines without muddying colors.
Use a light hand. If a shade looks too strong, pick up a skin-toned matte and sweep it along the edge to soften the transition. For precise blending, use a smaller brush to work only where needed instead of over-blending the whole lid.
Check your work in natural light and from different distances. Fix any uneven spots by adding a tiny amount of product and blending again. Good blending makes the look polished and professional.
Building Intensity with Darker Shades
Add depth by placing a darker matte shade at the outer “V” or outer third of the lid. Use a small crease brush to concentrate color and then blend outward. This creates dimension without covering the entire lid.
Layer gradually. Tap off excess from your brush before applying and build color in thin layers. If you want a smoky finish, smudge the darker shade along the upper and lower lash lines with a small smudger brush.
When you reach the desired darkness, clean the edges with a fluffy brush. Use a tiny bit of highlight on the center lid if the darker shade dulls the eye. This keeps the look defined and balanced.
Perfecting the Look: Eyeliner and Mascara
A clean, precise line and well-coated lashes finish your eyeshadow. Use the right eyeliner type for definition and choose mascara that matches your wear needs.
Applying Eyeliner for Definition
Decide which eyeliner works best for your look: a pencil for a soft line, a gel with an eyeliner brush for a crisp finish, or liquid for sharp winged shapes. For daytime, use a dark brown or black eyeliner and keep the line thin along the upper lash line. For more drama, thicken the line toward the outer corner and add a small wing.
If you want a softer effect, smudge pencil eyeliner slightly with a small brush or cotton swab. To make waterproof eyeliner last through humidity or tears, apply it in small, short strokes and set it with a matching powder or shadow. For precision, rest your elbow on a flat surface and pull the eyelid gently taut before drawing.
Use tightlining (apply pencil eyeliner to the upper waterline) to make lashes look fuller without visible liner. Clean up mistakes with a pointed cotton swab dipped in micellar water or a touch of concealer on a small brush.
Choosing and Using Mascara
Pick mascara based on the result you want: lengthening for longer lashes, volumizing for thicker-looking lashes, or waterproof when you need long wear. If you have short lashes, wiggle the wand at the base and sweep upward to lift and separate. For volume, build up 2–3 thin coats rather than one thick coat to avoid clumps.
Apply mascara to both upper and lower lashes, using the tip of the wand for lower lashes to avoid smudges. Replace mascara every 3–4 months to prevent eye infections and flaky formula. If you need waterproof mascara removal, use an oil-based remover and press a soaked pad against the lashes for a few seconds before wiping.
Avoid pumping the wand in the tube, which dries the formula. Instead, twist the wand out and coat lashes from root to tip in a steady motion.
Finishing Touches for Eye Makeup
After eyeliner and mascara, check for symmetry. Sit straight in a mirror and compare both eyes at natural light if possible. Use a clean spoolie to comb through lashes and break up any small clumps for a neater look.
Set your lower lash line by applying a thin layer of the same eyeshadow used on the lid; this helps blend any stray eyeliner and ties the whole eye together. If you used black eyeliner, brighten the inner corner with a light shimmer to prevent the look from appearing too heavy.
Carry a tiny brush and a waterproof mascara sample for quick touch-ups. For long days, blot the lash line gently with tissue to remove transfer, then reapply a thin coat of mascara if needed.
Popular Eyeshadow Looks and Pro Tips

You’ll learn clear steps, key brushes, and product choices that match each look. Focus on placement, blending, and the small tricks that make a big difference.
Classic Smokey Eye Technique
Start by choosing three shades: a light matte for transition, a medium matte for depth, and a dark for the outer corner and lash line. Use a fluffy crease brush to sweep the transition shade slightly above the natural crease. This lifts the eye and gives you a smooth gradient.
Pack the medium shade onto the lid with a flat shader brush. Tap, don’t swipe, to avoid fallout. Apply the dark shade to the outer V and blend inward with small circular motions until edges soften.
Line the upper lash line with a smudged pencil or gel liner, then smudge with a small angled brush for that smokey finish. Add a touch of shimmer or light matte to the inner corner and brow bone to balance intensity. Use mascara and optional false lashes to finish.
Halo Eye Application
Pick a deep shade for inner and outer corners and a brighter shimmer for the center lid. Apply the deep shade in two crescent shapes on both corners, keeping a clean space in the center.
Use a small tapered brush to blend the edges of the two dark crescents into the crease. Press a shimmer or metallic shade into the central lid with a damp flat brush or your finger for maximum payoff. The contrast creates a round, spotlight effect on the eye.
Soften harsh lines by using a clean fluffy brush to buff the edges. Add a thin liner close to the lashes and a pop of inner-corner highlight to enhance the halo. This look works on all eye shapes; adjust how far the darks extend to suit yours.
Natural Eyeshadow Look
Choose neutral shades a shade or two darker than your skin tone for subtle depth. Start with a single matte shade across the lid and blend into the crease with a light hand. Keep pigment build-up gradual.
Use a small brush to add a slightly darker color along the upper lash line and outer corner for definition. Skip heavy liner; instead, smudge a pencil or darker shadow very close to the lashes for a soft look. Highlight the inner corner and brow bone with a matte or satin light shade.
Finish with one coat of mascara and groomed brows. Natural eyeshadow looks focus on even blending and skin-like finishes, so avoid heavy shimmer or high-contrast tones.
Eye Makeup Tips for Every Occasion
Match intensity to the event: daytime = softer mattes and light liner; evening = deeper mattes, shimmer, and bolder liner. For long wear, always use an eyeshadow primer and set cream bases with a matching powder shadow.
Tool checklist:
- Fluffy blending brush for transitions
- Flat shader brush for lid packing
- Small pencil brush for detail and lower lash line
Control fallout by tapping excess product from your brush and working in thin layers. For shimmer, wet your brush slightly to boost pigment. When in doubt, blend more—seamless edges read polished in photos and close-up.
Frequently Asked Questions
This section covers the tools, step-by-step actions, blending tips, color choices for different eye colors, and when to use matte, shimmer, or metallic finishes. Each answer gives clear, practical steps you can use at home.
What are the essential tools needed for applying eyeshadow?
You need a few basic brushes: a flat shader brush for packing color, a fluffy blending brush for the crease, and a small pencil brush for the lower lash line and outer corner detail. These three brushes cover most looks.
Add an eyeshadow primer to help color stick and last. Keep a clean spoolie or angled brush for brows and cleanup, and a small mirror you can look down into for steady application.
Can you explain the basic steps for creating a simple eyeshadow look?
Start with a clean lid and apply a thin layer of eyeshadow primer or concealer. This evens skin tone and prevents creasing.
Pat a neutral base shade over the lid with a flat brush. Use a mid-tone matte in the crease with a fluffy brush to add depth, blending back and forth.
Apply a slightly darker shade to the outer corner to shape the eye. Finish by smudging a bit of the mid or dark shade on the lower lash line and adding mascara.
What techniques should I use to blend eyeshadow seamlessly?
Use light, windshield-wiper motions in the crease with a clean fluffy brush to soften edges. Small circular motions help smooth lines between colors.
Tap off excess product before applying to avoid harsh patches. Build color slowly in thin layers instead of adding a lot at once.
How can I choose the right eyeshadow colors to enhance my eye color?
For blue eyes, pick warm browns, coppers, and bronze tones to make blue stand out. These warm shades create contrast.
For green eyes, try mauves, plums, and rich browns to bring out green flecks. Purple-family colors work well.
For brown eyes, use golds, bronzes, navy, or deep plums for contrast and brightness. Brown eyes handle most colors, so pick shades that match your skin tone and the look you want.
What are the differences between matte, shimmer, and metallic eyeshadows, and when should each be used?
Matte shadows have no shine and work best for base shades, crease definition, and blending. Use them when you want a natural or structured look.
Shimmer shadows have fine sparkle and add dimension and light to the center of the lid or inner corner. Use shimmer to brighten and make eyes look larger.
Metallic shadows have a foil-like finish and deliver intense shine and color payoff. Use metallics for bold evening looks or to create a focal point on the lid.